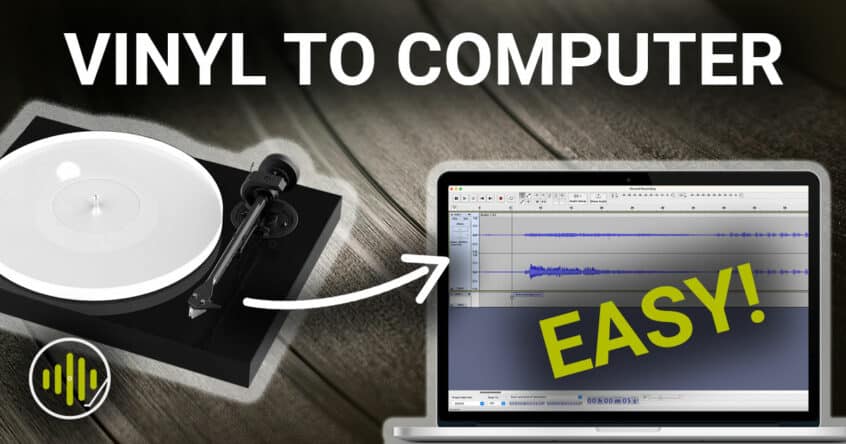
Vinyl ripping 101 – Digitize vinyl the easy way:
In a world increasingly dominated by the convenience and portability of streaming services, some collectors may question the value of digitizing or recording vinyl records.
There are still plenty of good reasons to capture the sound of vinyl and turn them into convenient digital files that you can take with you wherever you roam.
For starters, many of the records you own could be unavailable in any other format. With some older recordings, or even more obscure artists, it is quite common that a recording may never have been re-released.
Alternatively, you might just prefer how a recording on vinyl was mastered compared to the digital release. Many record labels and engineers master to each format, and in some cases, the vinyl master receives more gentle compression, which can result in a less squashed, more dynamic-sounding recording.
There are, of course, plenty of further reasons. It could be that you prefer the aesthetic of how vinyl sounds. Or, perhaps, you’re not keen on streaming, but would still like the convenience of digital files on the move.
Whatever your reason for recording vinyl records to a computer, you’ll need a few crucial pieces of kit and a few instructions to get you started.
Watch the video below and scroll through the step-by-step instructions in this article for a complete overview.
Recording from Vinyl to a Computer: What You Need
There are three ways you can approach LP recording to a computer, each with its pros and cons.
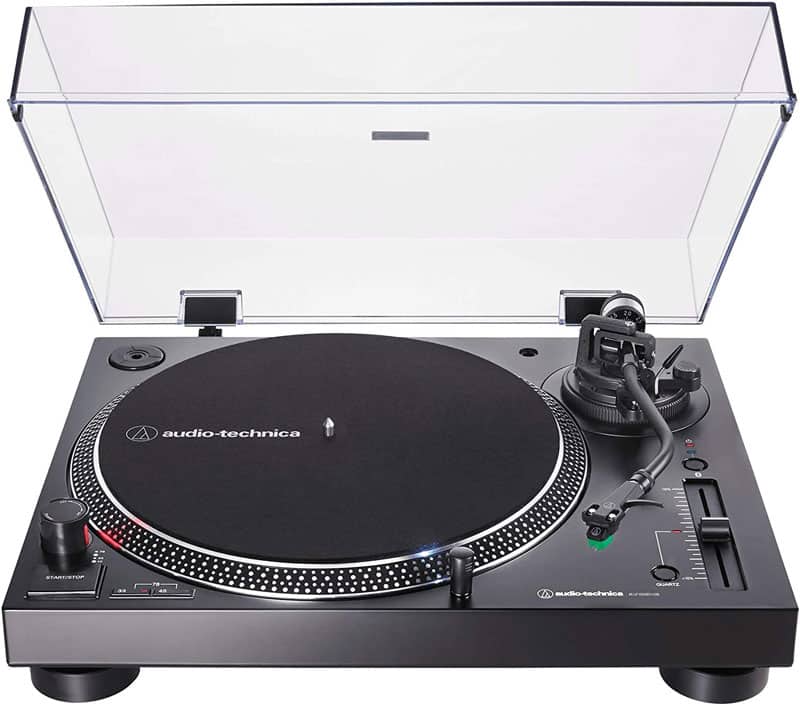
Method One: Use a USB Turntable
The simplest way to digitize vinyl records is to buy a USB turntable. In other words, a record player/turntable that can play your records and send a digital signal to your computer via the convenience of a USB cable.
There are now many affordable turntables on the market with a USB output, and going down this route will avoid the need for a separate phono preamp and audio interface to connect the turntable to a computer.
The Audio-Technica AT-LP120XBT-USB offers a good balance between cost, quality, and convenience.
This option is by far the simplest way to get set up, but it’s worth keeping in mind that with convenience, there’s usually a trade-off regarding audio quality.
Method Two: Phono Preamp with USB Output
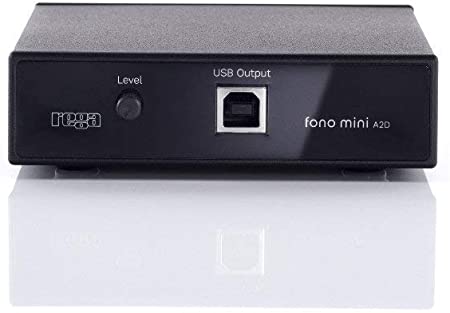
If you already own a good-quality turntable, purchasing a phono preamp with a built-in USB output is a convenient option.
The Rega Fono Mini A2D MK2 is a superb-sounding affordable preamp with a handy USB output for convenient LP recording.
Phono preamps with built-in USB outputs make recording vinyl as high-quality digital files very quick and easy. For most people, this option offers the best compromise between convenience and quality.
For this step-by-step recording vinyl tutorial, we’ll be using the Rega preamp mentioned above.
Method Three: USB Audio Interface
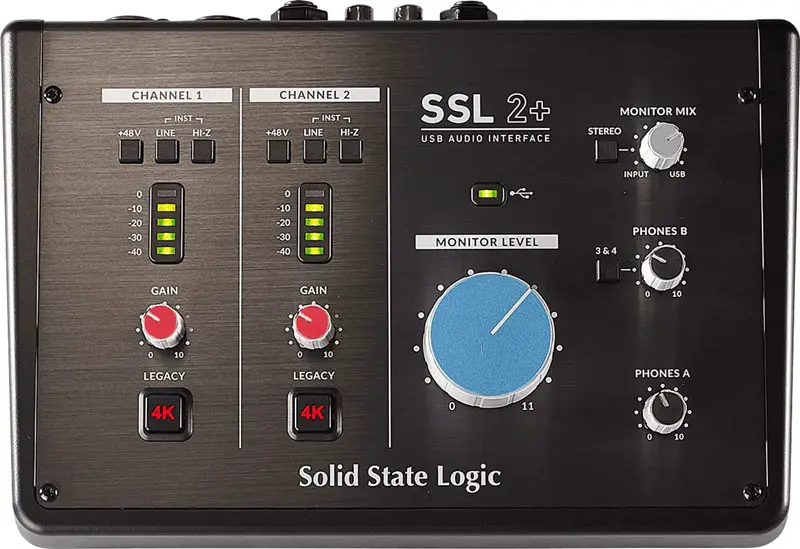
If you want to use your existing phono stage, purchasing a separate professional USB audio interface will allow you to record from vinyl to computer using your existing kit.

Providing your audio interface has good analog to digital converters, this route is by far the best method for high-resolution vinyl ripping. As an interface, I like the SSL2+ as an affordable option with high-quality AD/DA converters.
Depending on your phono preamp, you may need to purchase some additional RCA phono to XLR cables to connect your turntable to an audio interface.
It’s also worth considering the difference in signal level output between most consumer audio products and professional studio products. More on this later in our FAQ section.
Recording Vinyl to a Computer with Audacity
Once you’ve managed to connect your turntable to a computer using one of the three methods described above, you’ll need some software for recording vinyl.
Luckily, this step doesn’t have to cost you a lot of money. In fact, it won’t cost you a penny.
There are paid premium options, such as the fantastic Vinyl Studio software, but for this tutorial, we’re going to download a free open-source recording program called Audacity.
Using Audacity, you’ll learn how to record vinyl records and export them as separate digital tracks, complete with meta-data for artist, album, and song information.
Step 1: Download Audacity

You can download Audacity for free by clicking here (Latest version 3.4.2). The program works on a PC or a MAC and the website will automatically detect which operating system you’re on before you click download.
Step 2: Setup Your Audio Preferences in Audacity
When you first open Audacity, you’ll need to set up your audio inputs, outputs, and preferences before recording vinyl into your computer.
Firstly, click on the Audio Setup button. This will enable you to select the appropriate recording device. (In this case, we’re using the Rega Fono Mini preamp, which is labeled as “USB Audio Codec”).
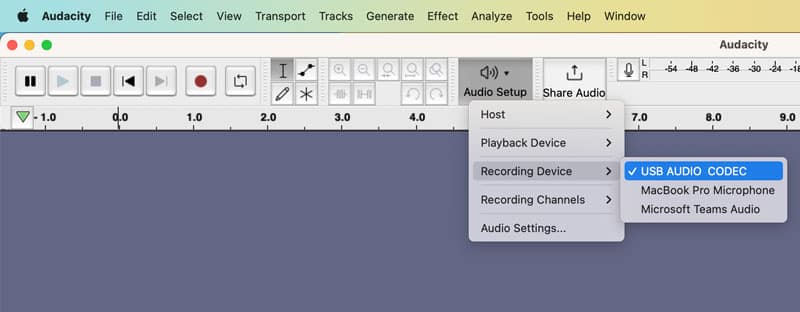
Next, select how you’d like to hear audio playing back from Audacity by selecting the appropriate playback device. This could be your computer’s speakers or headphone output.
Lastly, make sure you are recording the right channels from your device. In the recording channels tab, it may initially be set to “mono” as default. We want to capture separate left and right channel information from our USB output, so in this case, we want to change the recording channels tab to record stereo.
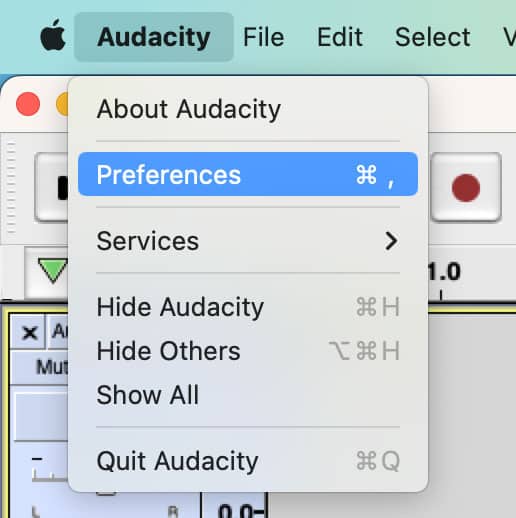
Step 3: Set Your Audio Quality Preferences
Once our audio devices are selected correctly, we need to ensure we are capturing the best digital audio quality possible.
Head over to the preferences section of Audacity and select the “Quality” tab.
Here, we can select the correct sample rate and bit depth for high-quality vinyl ripping.
In the case of our Rega Fono Mini, the highest possible setting is a 48000 Hz (48 KHz) sample rate and a 16Bit sample format. This is a touch above CD quality, which is the industry digital standard at 44.1 KHz and 16Bit.
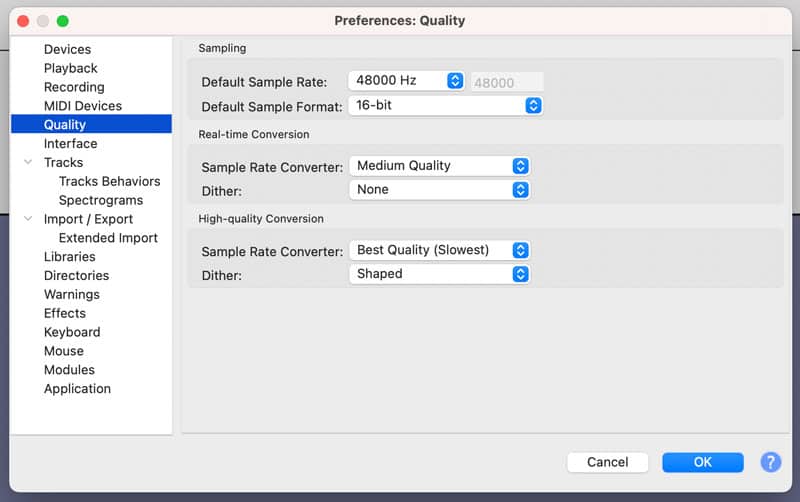
If you’re using a separate professional USB audio interface, such as the SSL2+ mentioned earlier, then you will be able to push these settings as high as a 192,000 Hz (192KHz) sample rate with 24 Bit.
There’s much debate about the real benefit of higher sample rates and Bit-Depths, but since file storage is relatively cheap these days, I recommend going as high as your device will allow if you can afford to do so.
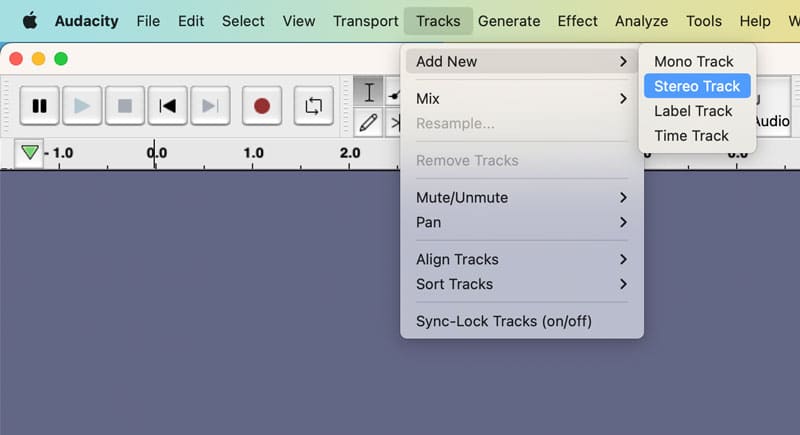
Step 4: Add Your Audio Track
Next, we need to add a track in Audacity for our LP recording. To add a stereo recording track, simply click “tracks” at the top of your screen. Then “add” followed by “stereo track”.
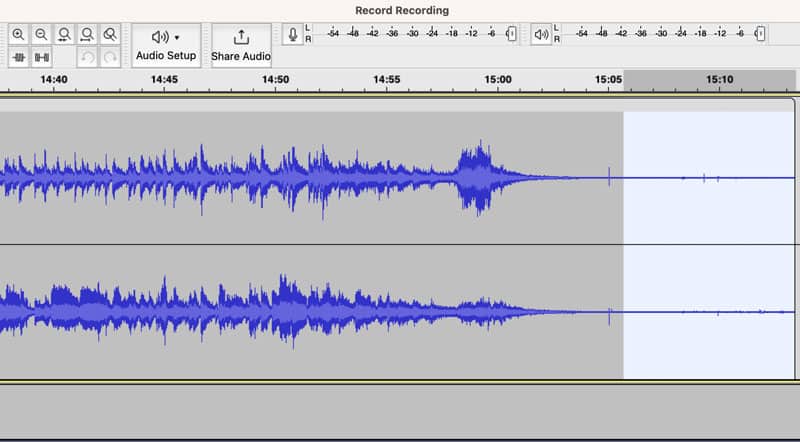
Step 5: Monitor Your Record Input Levels
With a track in place, we can begin to monitor the signal strength of our record coming in to ensure we get a strong signal without digital distortion.
The first step here is to head back to the preferences section of Audacity and click “recording” on the left-hand side. When you open this section, you’ll want to check the box labeled “Software playthrough of input”.
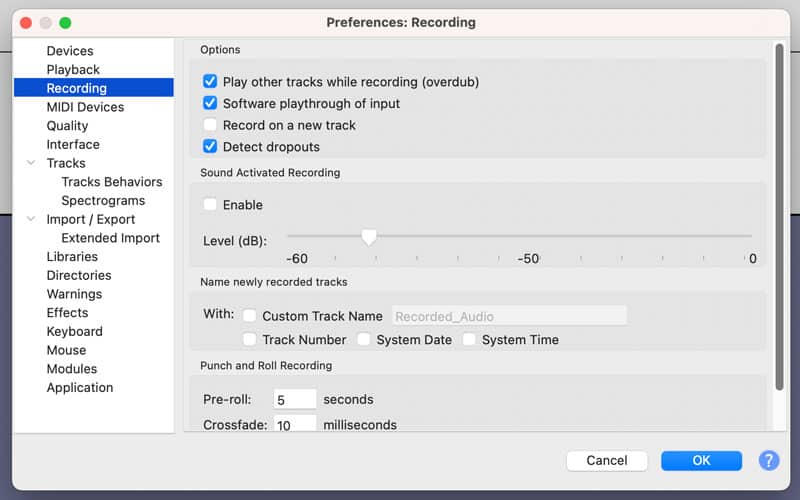
This will enable you to monitor how your record sounds during the vinyl recording process. I recommend using headphones to avoid any sound returning to your cartridge and degrading the audio quality.
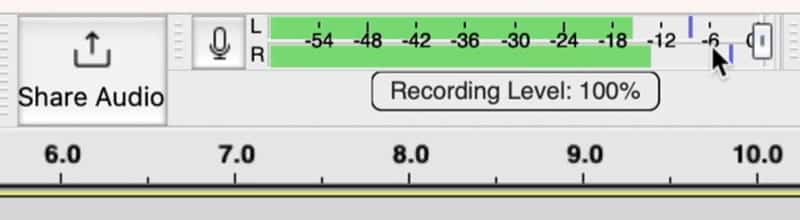
Next: hit the microphone button next to the “share audio” button and select “start monitoring”.
Play your record through a few loud sections and monitor how strong the signal is. We want a good strong signal, but we need to give plenty of headroom to ensure we don’t push over 0dB. If this happens, you will get digital clipping on your records.
A good rule is to aim for between -12dB and -6dB as a peak to ensure enough headroom for any spikes.
The Rega Fono Mini preamp has a really handy level dial at the front for adjusting the recording volume, making it easy to adjust levels until you’re happy there’s no chance of pushing over the 0dB cliff edge.
Step 6: Start Recording.
Starting the recording process is simple. Hit the red record button and then lower your stylus. You’ll have some silence and the needle drop at the start, but don’t worry about this as we can remove it before exporting as digital files.
Once you get to the end of side A, you can pause the recording, flip over your record, and clean your stylus before continuing to record side B.
Step 7: Add the Album and Individual Track Meta Data
Once the recording stage is finished, you can begin to add metadata that digital audio players and music libraries will understand.
There are two steps here: the overall album information and then the individual track names.
Firstly, add the album information by clicking “edit” in the top menu of Audacity and then selecting “Metadata”.
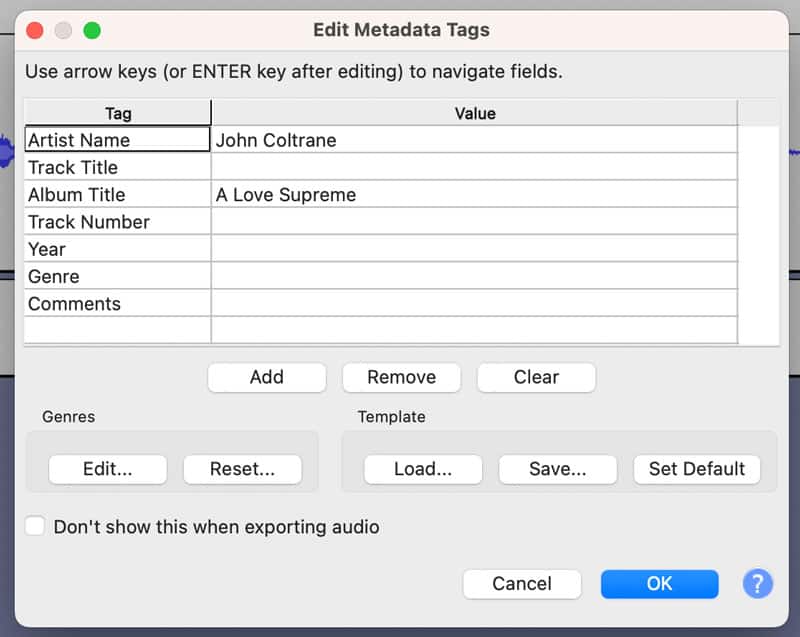
In here, you can add the artist’s name, the album title, and additional information such as genre and year of release. (Leave the track name blank for now). The more information you add here, the easier it will be to build a digital library of your LP recordings.
Click OK when you’re done and we can now begin to add individual track names. To do this, we’re going to add “labels” in the silence between tracks.
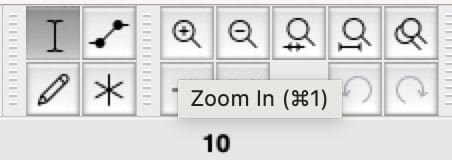
Use the zoom buttons to zoom closer into your recording and place the mouse cursor at the point when a new track starts. Listen carefully to ensure your playhead is in the correct position, and when you’re happy, head to the “edit” menu once again and select “labels”. In here, choose “add label at selection”.
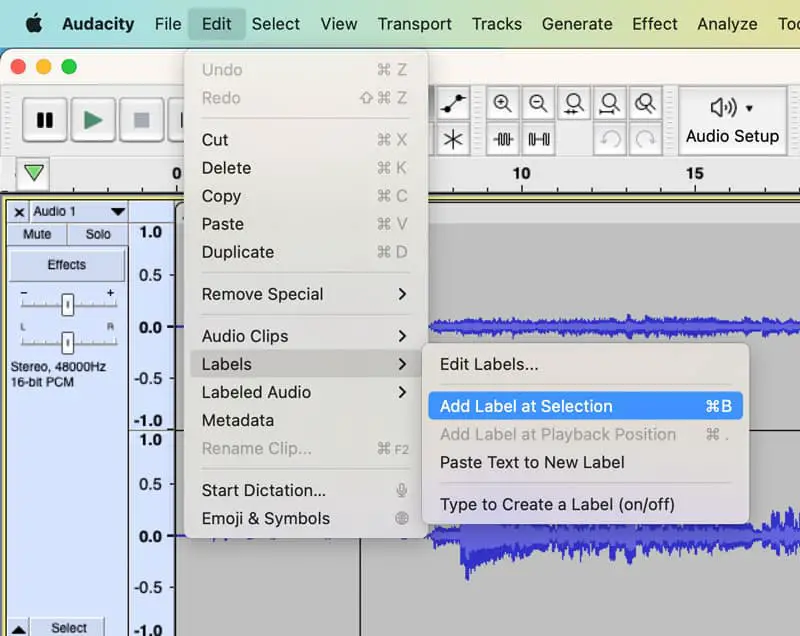
You can now add the song name to your label and repeat this process for each individual song on your digitized vinyl.
Step 8: Remove Any Unwanted Noise and the Run Out Groove
With our track labels in place, we’re almost ready to export our vinyl recording as individual digital files.
There’s just one last step to complete first…
You’ll need to remove any unwanted silence and run-out groove sound from the end of each record side.
To do so, simply click and drag your mouse cursor over the section you want to remove and hit the “backspace” button on your keyboard.
Step 9: Exporting your Record
Exporting the record is simple. Head to “File” in the main menu and select “Export Audio”. This will open the export audio window.
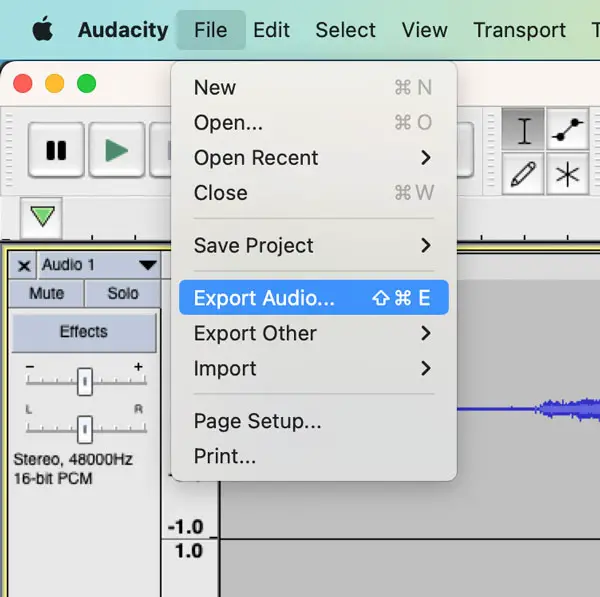
From here, we can choose to use our labels as track names and export them in our chosen file format.
WAV and AIFF file formats are completely uncompressed and perfect for archiving and vinyl ripping.
However, for convenience, we may also want to create lossy compression versions (MP3) or lossless compression copies (FLAC). For the best audio quality, choose an uncompressed or lossless file format.
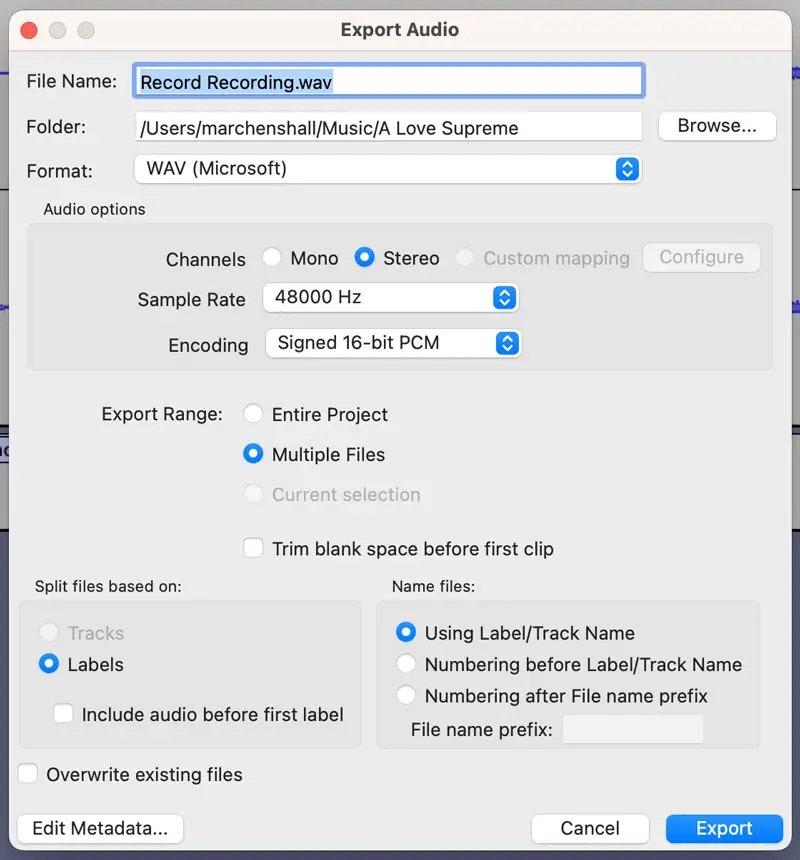
Next, ensure the “Export Range” is set tp “Multiple Files”, this will ensure we export multiple separate tracks rather than one big file.
Under “Name Files” ensure you select “Using Label/Track Name” as per above to ensure you separate tracks based on the label markers we created earlier in this tutorial.
Before hitting “export”, ensure the “include audio before first label” option is NOT checked. This will ensure we remove any unwanted run-in groove noise or the needle drop.
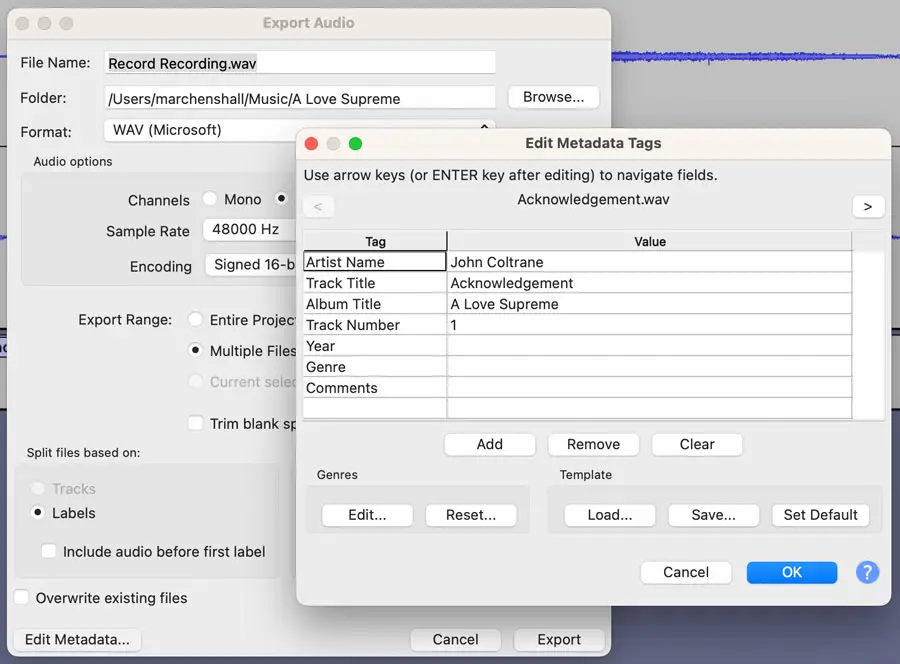
If you wish to check the track names before exporting, you can do so by hitting the “Edit Metadata” button pictured above, which will open the window below where you can check track-by-track.
Step 10: Check Your Final Export
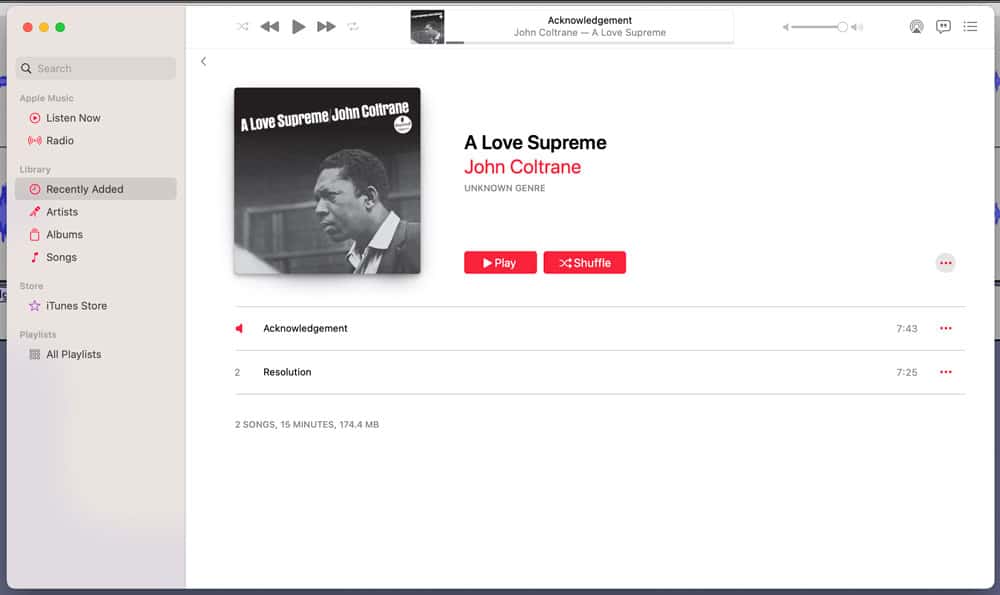
Head to the folder where you saved the exported files to check all the file information is correct. If we take AIFF files as an example, you’ll note how all the metadata has been added successfully, and Apple Music has detected the album and added the artwork. (For the purpose of example, I have exported side A only of this album).
And that’s it! Congratulations. You now have a digitized version of your vinyl record you can enjoy on the move or in your favorite music player.
Now pour yourself a drink, sit back, and enjoy the music. You’ve earned it!
FAQ: Can you Plug HiFi RCA Outputs Into a Studio USB Audio Interface?
USB audio interfaces often provide better analog to digital converters than USB turntables or USB outputs on phono preamps.
However, before you go down this route, it’s worth remembering that consumer Hi-Fi electronics output a different signal level to standard “professional” studio devices. The most common nominal level for professional audio equipment is +4 dBu, whereas most consumer Hi-Fi audio works at a nominal level of −10 dBV. We refer to both as professional line level and consumer line level, respectively.
The connectors are also different. As a general rule, consumer outputs are the familiar RCA phono connectors we all know; professional outputs are usually 1/4 inch TRS or XLR connectors.
Don’t worry too much if all of that seems like a lot of information. But you might want to consider this when choosing an appropriate audio interface for the best results. An audio interface like the Apogee Duet will accommodate both pro and consumer line-level signals by selecting the correct analog level in their Apogee Maestro application.
The Duet is also famed for the quality of its analog-to-digital converters, making this a great option if you already own a great-sounding phono preamp and want the ability to capture high-quality digital recordings of your existing setup.
As an alternative, if you already own an audio interface, consider adding a Radial J+4 to the signal chain between your phono preamp and the USB audio interface to boost the signal from consumer line-level to pro audio +4 dBu.
Nice introduction, but note that the latest version of Audacity is 3.4.2.
I’m a long-time Audacity user and It has recommended recording with 32-bit floating bit depth and sample at 96 kHz so that if any processing is done to the recording, such as using a software RIAA filter, removing DC offset between channels, adjusting the gain to -1.0 dBFS, or setting loudness to what broadcasters’ recommend so that all your album rips have the same loudness (dynamic range is not changed), then those settings work best for that. Set the final bit depth and sampling rate with the audio export, such as 16-bit/44.1 kHz for example.
Also, set the audio quality settings to the highest and use dither for conversions. I think medium quality is the default.
I didn’t know about the track marking and export process and had been using cut, export, undo, cut, export, etc. Thanks for pointing out how to simplify this.
If you want lots of detail about the vinyl-rip process, I recommend the Needle-drop Handbook by Richard Brice available at Pspatial Audio’s website. They also make Stereo Lab Audiophile software (for macOS and no Windows version, unfortunately), which is used with Audacity; I use it to decode quadraphonic LPs (and CDs) and to apply pre-RIAA equalization to discs released before 1955. It also improves the SNR of mono discs very well by using an averaging process.
Thanks for the video.
A couple of things I’d like to add about Audacity:
Set the audio setup host to Windows WASAPI (other operating systems will have an equivalent), or, otherwise, system sounds may get into your recordings. I think the default may be DirectSound for the Windows version.
Using 32-bit float also makes it easier to use click removal, the rumble filter, and spectral analysis. For click removal, it’s best to capture the audio without RIAA EQ, use the click removal, and then apply RIAA EQ with Audacity. Lastly, normalize loudness to -16.5 or -24 LUFS (broadcasters and steamers use -24) and then export the audio. If click removal is used, listen if an improvement was made at the expense of the audio; undo and redo allow for much experimentation. (Most ADCs may have enough gain that you don’t need a phono preamp at all, hence, no hardware RIAA EQ then either, but check the input impedance of the ADC to see if it’s near 47 kohm and less than about 200 pF, and use short, low-capacitance cables.)
Years ago, I used a MS program called ‘Analog Recorder’. It ran very well on Win98. Since then, I managed to get a copy of the CD it came on and tried running it on Win10, but it wouldn’t install. I loved that program, as it was super easy to use and learn. I have ‘tried’ using Audacity many times, but it’s just too complicated and unpredictable for me, I guess. Your tutorial gives me hope that, maybe, THIS time I can make it work. Short of finding some way to make Analog Recorder work on Win11 or Linux Mint, I will have to try, once more, to get Audicity up and running for me. Keep up the GREAT work with your tutorials, Marc!
Hi Robert. That’s a shame. Do try going through the tutorial and let me know how you get on. The included step-by-step video should help a lot. They have slightly changed the export menu, so if you get stuck at this point, email me and I will help you get it done.
Analog Recorder is probably a16-bit program. Windows XP is the last version of Windows that will run 16-bit programs. You can always try VM VirtualBox for Windows 10 that runs Windows XP, but that is probably more complicated that learning how to use Audacity.
I have a UFO202 Behringer audio interface. I have looked online how to connect the interface with my stereo receiver and my computer sometimes recognizes the interface and sometimes doesn’t, when I am in Audacity. I am totally frustrated because I want to digitize my albums and cant’ get the hardware to talk to my computer. Any advice?
Have you tried downloading the ASIO4ALL usb audio driver available on the UFO202 product page?
https://www.behringer.com/product.html?modelCode=0805-AAC
Try this, and if that fail, I would consider a new audio interface.
excelent article !!! i have a question if i connect my Audio-Technica AT-LP120XBT-USB direct to pc .. what will be the maximium quality that i will obtain?
Perfect instructions. Just started on the journey of ripping my House records from nearly 15 years ago. I am getting a bit of pre noise like it needs a better earth but I’ll figure it out. Thanks again for the guide. ????
Great to hear, Richard. I’m pleased it helped. Buzzing in HiFi systems can be a real pain to troubleshoot. One thing you can do to minimize this in your vinyl recordings is to remove as many unneeded components from the signal chain as possible.
So if you have the option to go directly from an external preamp without also going through an amplifier or receiver, I would try that.
Turn off as many other close-by electronics as possible.
Hope this helps further! Enjoy recording vinyl and happy spinning.
Wonderful instructions! If my phono cartridge response is between 20 and 50,000 Hz, is there any point in getting an interface that pushes up the Hz past 48,000? Would that improve the sound? – thanks!
Glad it helped! To capture the highest frequency in a digital system, you need a sample rate double that of the highest frequency you want to capture. That means you’re basically looking at a sample rate of 96KHz or higher to match your cartridge frequency response. That said, 50KHz far exceeds the range of human hearing, so there’s some debate about what the real benefit of capturing frequencies this high might be… a big topic.
That said, hard drive space is relatively cheap these days, so if you’d like to go for a higher sample rate, by all means, why not capture the best possible file you can 🙂
Audacity is a great tool but you’re forced to enter metadata manually. It’s hard enough ripping vinyl 🙁
I switched from Spin it again to Vinyl Studio. MAJOR advantages over Spin it again are that it can save to FLAC, it is easy to split into individual tracks and it’s easy to import track listings from online sources. You can also import audio files, e.g., those ripped with Audacity.
Hi Marc, the video on converting vinyl music to computer files was outstanding! I’ve always wanted a step by step instruction. It was clear and concise. For me it was your best post ever!
Thank you Wayne! I’m glad to hear it was helpful. “Best post ever” – that’s really kind of you. I’d like to more of these really detailed step-by-step tutorials, so watch this space or feel free to make a suggested topic! Happy spinning
Mark,
Thank you for this one, it was really helpful. I haven’t ripped albums in years but there are a few I have that I wouldn’t mind copying.
Great stuff David. Thanks for the kind words. Happy vinyl ripping, and do let me know if you have any questions about the process.
Wonderful post and discussion. I’m new to this. I will be using either Audacity or Vinyl studio. Is it better to run cables from my phono preamp or from the line out of my integrated amp into which my phono preamp is wired?
Hi Russ. Sorry for not spotting this comment sooner: Going straight from the phono preamp will simplify the signal chain and likely reduce the potential for noise. If your integrated amp has a consumer-level “line out” at -10dBv you will benefit from a signal booster (such as the Radial J+4 when going into a USB audio interface. Hope this helps!
[…] price having won awards in its price bracket. It also features a really handy USB output that makes digitizing your records […]
[…] The answer to this question all depends on your perspective, and your individual consumption habits. I, for one, haven’t yet made the switch to streaming. Perhaps this makes me old-fashioned, but I’m a huge believer in the importance of music ownership, and the effect this has on our perception of music’s value. So for me, the decline of download cards represents a decline in value for money. Increasingly, if I want a digital copy of a new record, my only choice is to go through the arduous task of digitizing the record myself using recording software. […]
[…] 1. How to Digitize Your Vinyl Records – Sound Matters […]
I installed Spin It Again many years ago – not expensive and so easy to use with very good results. It’s selling for $19 US – you just need to ensure that you’ve got the right cables to output/input into your computer https://acoustica.com/products/spin-it-again
[…] process is relatively simple, but for those who want some guidance, consider forwarding our guide to recording (ripping) vinyl to your […]
I’m a new subscriber who has been digitizing the best LPs of my collection and getting great results. My TT MC cartridge is high output and wired fully balanced into a fully balanced phono pre whose output is fed directly into a pro-audio A2D interface. I record only at 192k/24-bit, perform digital editing to separate the tracks, remove ticks with iZotope RX software, then final master to 44.1k/16-bit with dither. Most of these home-made digital tracks sound much better that the same tracks on commercial CDs and I can enjoy them in my car and iPods.
[…] 10. How to Digitize Your Vinyl Records – Sound Matters […]
I have been using GoldWave for many years and am very happy with it. It’s not free, but at $45 for a lifetime licence the cost is very reasonable. It has a number of options aimed at recording from analog recordings. It is a little daunting to start with, but the help file is very clear.
Thought I’d give Studio One a go but struggling to find out how to change the sample rate I usually go for 48kHz but only getting 44.1 offered in song setup. Think I’ll stick with trusty clunky Audacity
If Audacity is working for you, go for it; whatever makes it easier at the end of the day. As is the nature with technology, there are so many variants that can cause problems with software (a different sound card/audio interface that the software doesn’t like, for example). In my experience Studio, One is preferable to the open-source Audacity option, but your mileage may vary. Happy listening.
Hey is it possible for you to contact me if you can.
[…] process is relatively simple, but for those who want some guidance, consider forwarding our guide to recording (ripping) vinyl to your […]
[…] Note: Vinyl records are often mastered with better dynamics – thanks in part to the inherent limitations of the analogue format. If you prefer the sound of your vinyl for this reason, but love the convenience of digital – it’s worth considering a high quality pre-amp such as the Radial J-33 combined with a high-quality audio-interface for archiving records to your computer. […]